Showing posts with label How-To. Show all posts

Friday, 10 March 2017

How to Replace a Computer Power Supply Died

How to Replace a Computer Power Supply Died


How to Replace a Computer Power Supply Died - After two or three years to buy a computer, can course PC will be experiencing functional damage because of the computer does not turn on due to a faulty power supply burned/ charred, may damage the my the working of a power that is indeed short. But, it can be used as a regulator of other .

Don't underestimate the importance of Your Computer's power supply. A good power supply to function, as a basic device of a computer which is very great. If You are looking for how to replace computer power supply that died. You are now reading the right article, because here we will write down some steps about it. 


Here are the steps to replace the computer power supply that died


 Part 1 

  1. Consider a 6 + 2 pin connector that is used to provide voltage to the graphics card and CPU. 
  2. The first thing You should do is use a pair of gloves (to avoid static electricity) and a screwdriver to take it off couplers. 
  3. Start by unplugging the electric cable connected to Your computer. power supply unit (PSU) includes a power switch accessible on the back of Your PC. 
  4. Remove the pin-pin connector 24-pin connected between the motherboard with the pins of the power supply, be careful when you take it off. 
  5. Make sure the large connector that will be replaced is exactly the same so the new power supply actually works to supply the electricity.
  6. Next thing remove the screw that secures the casing of the power supply with the casing of the CPU, usually located at the back of as much as 4 pieces.
  7. Now You can pull the PSU of Your old out of the casing of the CPU after the couplers are completely disengaged.
 Part 2 


  1. Usually replacement PSU exactly the same although different brand. To note is the large power PSU, new 450W, 500W,  etc.
  2. Then plug the cord-the cord and the connector to the motherboard 24-pin power connector 4-pin or 8-pin, optical drive, hard drive/ SSD, the fan connector, and so on. 
  3. Screw back and tighten it so firmly stick in the casing of the CPU. 
  4. Before turning on the computer, you should check again if the error occurs can be minimized. 
  5. The last step is to do test the power supply whether it is working or not, then close tightly the box of the PSU. 

How To Defrag A Computer Windows 7,8 and XP

How To Defrag A Computer Windows 7,8 and XP - Defragging the computer can help speed up performance by rearranging and better utilizing additional space on the hard drive of your computer. Computers with newer operating systems such as Mac OS X and Windows 8 will defrag your computer automatically, while the old operating systems like Windows XP will ask you to defrag your computer manually. Follow the steps below to learn how to defrag your computer manually, or to modify the automatic defrag schedule.


How To Defrag A Computer Windows 7,8 and XP

 Method 1 : Defrag in Windows 7 and Windows 8

How To Defrag A Computer Windows 7,8 and XP

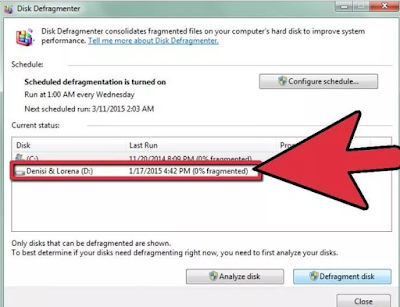
1. Go to the "Star Menu" then select "All Program."

How To Defrag A Computer Windows 7,8 and XP

2. Open "Accessories," then select on "System Toll."

How To Defrag A Computer Windows 7,8 and XP


3. Select "Disk Defragmenter,"

How To Defrag A Computer Windows 7,8 and XP

4. Select the disk drive that You want. For example, You want to your computer hard drive is the main in the defraged, then highlight “(C:).“ 

How To Defrag A Computer Windows 7,8 and XP

5. Tap on "Analyze Disk." Your computer directly analyze the Disk Drive to determine whether a defrag is recommended at that time. 

How To Defrag A Computer Windows 7,8 and XP

6. Tap on "Defragment Disk" if your computer intructs you to continue with the manual defrag.

How To Defrag A Computer Windows 7,8 and XP

7. Wait Your Computer During the Defrag. The process of dafreg can take anywhere from a few minutes or a few hours to complele.

How To Defrag A Computer Windows 7,8 and XP

8. Tap on "Trun on Schdule" when disk defragmenter has stopped running.

How To Defrag A Computer Windows 7,8 and XP

9. Verify that a checkmar is displayed next to "Run on a Schdule."


How To Defrag A Computer Windows 7,8 and XP

10. Specify the frequency, date and time. This allows you to set the computer to automatically defrag themselves.
How To Defrag A Computer Windows 7,8 and XP

11. Tap on "OK," then click on the button labeled "Closed" Your computer will come out from the Disk Defragmenter, defrag Your computer and automatically on the frequency, date, and time that you specify.


 Method 2  : Defrag in Windows XP


How To Defrag A Computer Windows 7,8 and XP

1. Go to "Start" then select on "My Computer."

How To Defrag A Computer Windows 7,8 and XP

2. Point to "Local Disck," then right-click and tap "Properties" from the floaring menu.
How To Defrag A Computer Windows 7,8 and XP

3. Select on the tab labeled "Tools," Then tap on "Defragment Now." Disk Dafragment will open on your desktop.

How To Defrag A Computer Windows 7,8 and XP

4. Select the disk drive you want defragged, then tap on "Analyze." Your computer will analyze disk drive's file and folders to determine whether a defrag necessary.

How To Defrag A Computer Windows 7,8 and XP

5. Tap on " Defragment." Your computer wil; then take up to several minutes or several hours to defrag the disk drive, depending on the state  of your computer.

How To Defrag A Computer Windows 7,8 and XP

6. Tap on "Close" to exit the defragmenter.

Thursday, 9 March 2017

How to make Windows programs open as full screen

By default, Windows will open the program s in "Normal" size of window, meaning dimensions does not fill the entire screen. While users can easily maximize the window size by clicking the middle icon in the upper right corner, many who do not like to have to repeat the action every time they started the program. To force Windows to open the program in full screen mode proceed through the steps in the following sections.

How to make Windows programs open as full screen

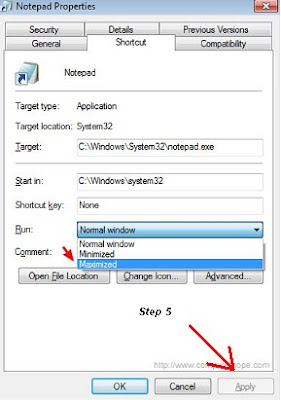
  1. Right click on any Windows shortcut and click Properties.
  2. In the Properties window, click the Shortcut tab.                                                                                                                                                                                                                                                 
                                         How to make Windows programs open as full screen                                                                                 
  3. Locate the Run: section, and then tap the down arrow on the right-hand side.
  4. In the drop-down menu that appears, select Maximized.
  5. Press apply and then OK. The program should now open in a full window

Tuesday, 7 March 2017

How To Set Parental Controls On Samsung Tablet


How To Set Parental Controls On Samsung Tablet

How To Set Parental Controls On Samsung Tablet - Having a child does give happiness for the family, and it should be the parents perform its obligations to provide security and comfort in children. In the era of technology that is sophisticated nowadays, smartphone or tablet has become a part of the game being played children. Indeed the level of enjoyment was much higher because of the many games offered by Android, but not all content is offered “safe” or good to be watched by children. 

As a parent, You can do security measures, namely to enable parental controls on samsung tablet. If You are looking for the steps to enable parental controls on Android, You have read the right article. Below we will provide a complete guide how to control the parental on a samsung tablet. 

 5 Step  : How to Set Parental Controls On Samsung Tablet

You can create a new profile and restrict the applications that can be accessible to a child this way, but currently this feature is only available for Android tablets :

How To Set Parental Controls On Samsung Tablet

1. Go to “Settings” on your tablet.

2. Select “Users”, click “Add User or Profile”, and select “Limited Profile”.

3. You will be prompted to create a PIN or pattern lock if You have yet to make it.

4. After that You will see the applications or features installed in the tablet, select the applications that should be accessible to Your child.

5. To access the restricted profile, lock Your tablet and select the new profile icon You have created to access the restricted profile of the child. If You want to re-use the tablet as usual, simply click the icon of Your main (on the left) and enter the PIN or pattern locks that have been made. 

Read Article Other :


 Method 2  : Restrict in-app purchases

Smartphone to currently have unlimited profiles, but parents can protect in-app purchases to prevent purchases that are not intentional or desired.

1. Go to "Google Play".

2. Tap the icon three lines in the top left corner and select "Setting".

3. Scroll to the "User" and select "requre authentication for furchases".

4. Select to always enter your password with Google if you want to make a purchase.

Content Filtering

You can restrict the content that can be accessed your child on Google Play, Here's How :

1. Go to "Setting" in Google Play

2. Scroll to the "Use Controls" and select "Parental Controls".

3. Alctivate and create your PIN.

4. After that, You can go into categories and set age limits that are allowed to access the           application in the chosen category. 

In addition to the two ways above, You can use third-party applications, such as AppLock to limit the application or content that can be accessible to a child. Share with us any feedback or experiences You restrict the content on Android in the comments field below.

Saturday, 4 March 2017

How To Delete Picasa Photos From Samsung Galaxy S5

How To Delete Picasa Photos From Samsung Galaxy S5 - You certainly upset with the emersion in the picassa photo gallery that can not be discarded, it truns out how to delete photos on your Android Picassa it way very easy. At first, i found difficult to remove the photo because there is no option to delete.

Want to how to delete picassa photos your Samsung martphone ? If you are looking for how do you delete photos from picassa. Please chek out this interesting article on how to quickly delete photos from Picassa below.

Here's How To Delete Your Picassa Photos On Your Android Samsung

  1. Step one go to Setting > Tap Accounts > Google
  2. Then, tap on your Gmail Account
  3. Uncheck "Sync Picasa Web Albums".
  4. Now again go to Setting > Application Manager
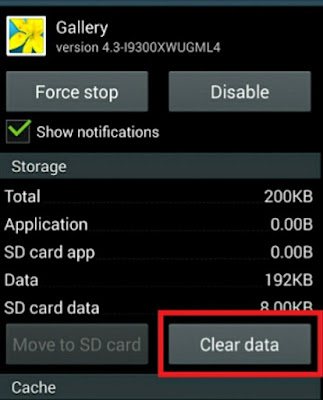
  5. Then slide to the right, select "ALL" and scroll down Tap "Galery".
  6. Tap "Delete Data" as shown below.

How To Delete Picasa Photos From Samsung Galaxy S5

You now will not see picassa photos on your device, and if you think by clearing data original photos, or video on Gallery. It will not efect, it will not erase your photos or videos from Gallery. I just clears the cache picture data from your gallery that was synced with your Google Picassa Album.

See Also


See,, that's How To Delete Picassa Photos From Samsung Galaxy S5. Very easy and fast is not ?..

How To Reset/Hard Reset a Samsung Galaxy Tablet 3

How To Reset/Hard Reset a Samsung Galaxy Tablet 3

How To Reset/Hard Reset a Samsung Galaxy Tablet 3 - Not rarely the smartphone owners often have problems on his gadget, it is associated with a variety of errors in usage. Usually the most common, such as the forgotten patterns, bootlop, as well as hp full cache so that smartphones become slow, etc.

Well if you are already experiencing those problems, yes inevitably must reset Reset factory settings to your smartphone. But for this road, of the data in it will definitely join the missing. So before you do a Factory Reset or a Hard Reset a Samsung Galaxy Tablet 3 as good back up in advance the importance of data.

Although there are many ways that can be done the other way sometimes, but usually only survive a short time just means are not effective. Therefore, to get the maximum results you must take this step.

Read Also :


How To Reset/Hard Reset a Samsung Galaxy Tablet 3

Note: Please make sure you has been backed up all of your essential data and apps before performing a reset.
 Here's How To Reset/Hard Reset a Samsung Galaxy Tablet 3 :

  1. Turn your Galaxy Tab 3 off.
  2. Tap and hold the Volume Up, Power and Home buttons together until you viewed an Android lying on its back. This is the - stock recovery screen.
  3. Using the volume keys to scroll down to Wipe Data/Factory Reset and use the Power button to confirm.
  4. Scroll down to Yes, Clear All User Data and hit Power for confirm.
  5. Back on the first screen, scroll down to Wipe Cache Partition and choose with power button.
  6. Presses the Reboot System Now to restart your Galaxy Tab 3 with factory settings restored.
Well, now you have managed to do a reset on the samsung galaxy tab 3. At this time your smartphone has come back as good as new, so that previous mistakes will be lost. So how to Reset Hard Reset Samsung Galaxy Tablet 3, please like and share.